Overview
Before diving into reverse engineering, I have to get myself familiar with some basic assembly instructions. This article will note them down, and use GDB or QEMU to debug them along the way.
And this article serves as an accumulative note as I will add more and more instructions along the way, and I will constantly update each instruction for more details and more sophisticated and advanced usage. More on the way then.
For those of you who can't wait and want to explore further, this is for you.
Mental Preparation
Like when some one should embark a long and hard journey anytime soon, there should be a prep talk.
The most intimidating enemy is always yourself.
To master something, you must first mentally put yourself under the context of what you're learning, become part of it.
That being said, to learn assembly, is to think under the context of registers, CPU. All things should be considered in hex or binary, every character you see should be processed and translated into corresponding data format which registers and CPU can understand.
Constantly ask yourself, am I behaving like a register? And am I thinking like a CPU?
Hard to do, but something you should do. And do or do not, there is no try. 😛
Take this as example:
MOV EAX, 0xdeadbeef
XOR EAX, EAX
NOT EAX
What is in EAX?
If thinking as a human, I would say 1. Because after XOR, EAX should be 0. Then you flip it with NOT, it should be 1. Right?
That's what I'm talking about, not thinking under the context of a register or a CPU.
If doing correctly, all I should see is 0s, and 1s. So, after XOR, EAX should contain 0x00000000000000000000000000000000, 32 0s.
Take a NOT, flip all bits, EAX now should contain 0x11111111111111111111111111111111, 32 1s.
The answer is 0xffffffff.
Do it to your mind, that's what controls all.
Sharpen Your Tools
In vanilla gdb, we have to constantly enter i r to view the content of all registers. There is always a better way.
Please refer to this post where the author will guide you through the process of setting up gdb with python extensions (peda and gef).
I personally used gef more.
The instant benefit of using an extension is that the registers are there all the time and you can see real time changes made. Plus the code is disassembled automatically and we can view the instructions easily.
Enjoy!
Assembly Instructions
Hereon I will start noting down assembly instructions and put up examples to better illustrate them.
Before continuing, please install gdb, qemu, nasm and make.
sudo apt install gdb qemu nasm makeNote that all following content are compiled under i386 architecture.
NOP
First ever instruction is NOP, which simply tells CPU to do nothing. In fact, this instruction is equivalent to XCHG EAX, EAX, which swaps the value in EAX register, well, in the end, it does nothing.
Here goes our first example code with instruction NOP.
I'll comment along the code so everything is clear. If not, please google 😀
nop.asm:
; comment goes here
; .text tells the assembler to switch to code segment to store the instructions
section .text

; this is the entry point of the program
; stick to _start please, you'll see why
global _start

_start:
    NOP
    NOP
So far so good, this is our first assembly (asm) program.
First thing I have to clarify is that the program entry point is denoted as _start. As I commented above, if we change that to other text, the linking process will throw warning at you!

So please, stick to _start as program entry point.
But what is that make thing, I'll come to that point in just a bit, it's just a way to make things easier.
So, let's compile the code above.
nasm -f elf32 nop.asmAfter the above instruction, the assembler will assemble the code, and generate a .o file.

For what is assembling, and what is linking, I got this for everyone, short and simple.
If you have read the above article, you'll know that the .o file is an object file. Let's inspect the file type of an object file.

We cannot execute object file, we have to link them first.
ld -m elf_i386 nop.o -o nopNow the nop file is an executable that we can run.


Run it!
./nopOooops! Segmentation fault. It's because our program doesn't exit properly. We'll address that later. Don't be hasty and follow along 😀

XCHG
As mentioned above, the XCHG instruction swaps the value in tow registers.
Nothing is better than writing a program and see how things pan out.
xchg.asm
section .text

global _start

_start:
    MOV EAX, 0x3
    MOV EBX, 0x5
    XCHG EAX, EBX
    NOP
    NOP
Compile and run.
nasm -f elf32 xchg.asm
ld -m elf_i386 xchg.o -o xchg
./xchg
Nothing happened...
In order to check what's going on under the hood, we have to learn a bit about gdb.
Debugging the Program
We'll use gdb here to set a break point on the entry and check the register values on each step of the program. This is not an extensive gdb related article, so please search for relevant topics.
gdb xchg
Now let's set a breakpoint on the entry point _start.
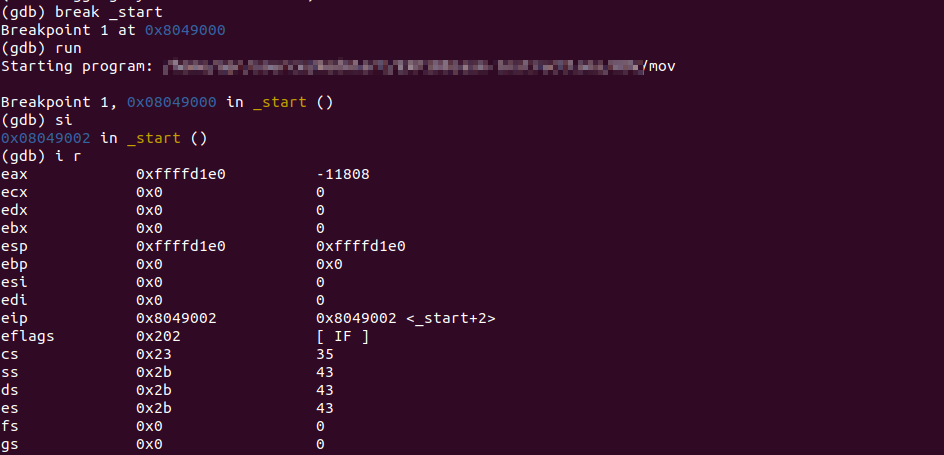
break _start
Now run the program.
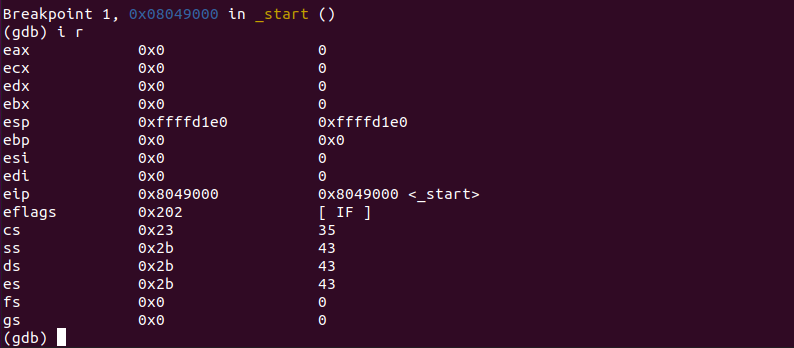
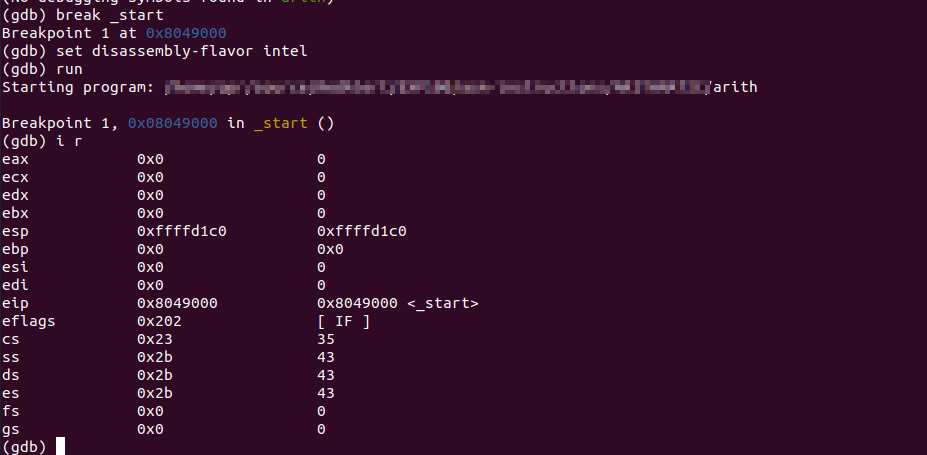
runGDB will show that we have hit our breakpoint, and it pin points the address of current address of the next instruction, which is 0x8049000.

Now, let's check our registers.
i rSince the program has just started, and we have stopped at the beginning of the program, nothing has been done yet, so the registers mostly contain nothing (0x0).
Let's check what's the next instruction we will be executing.
x/i 0x08049000We will be moving value 0x3 into register eax. Don't worry about mov yet, all you have to know now is that it move a value into a register.

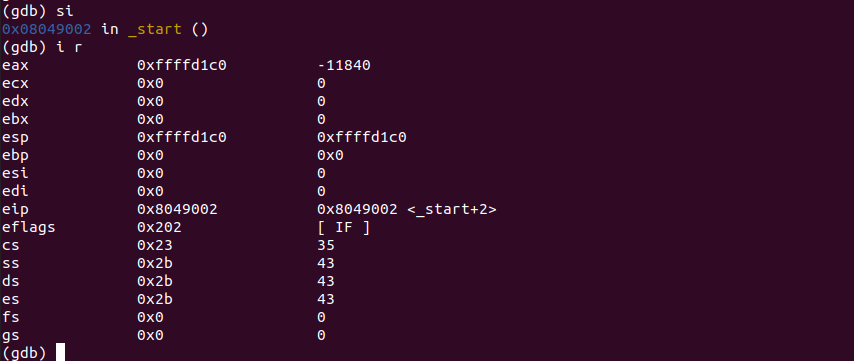
Now, let's execute the next single instruction.
si
Check the registers again.
i rNotice that eax now contains value 0x3 as expected.

Let's repeat this process. Next instruction should be moving 0x5 into register ebx.
Let's single step over that instruction.
ebx now contains 0x5.
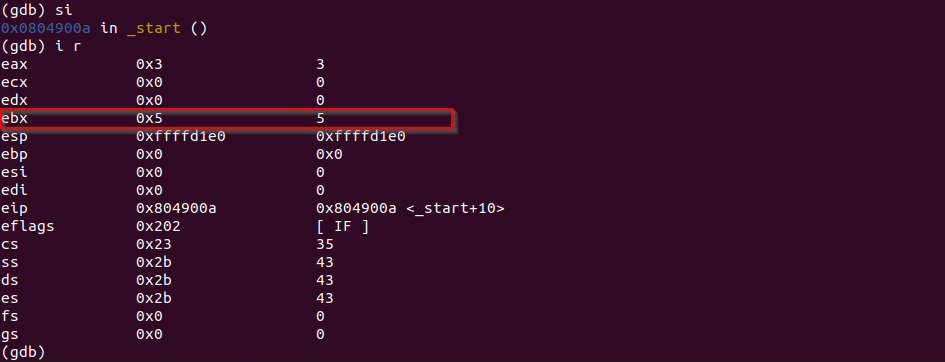
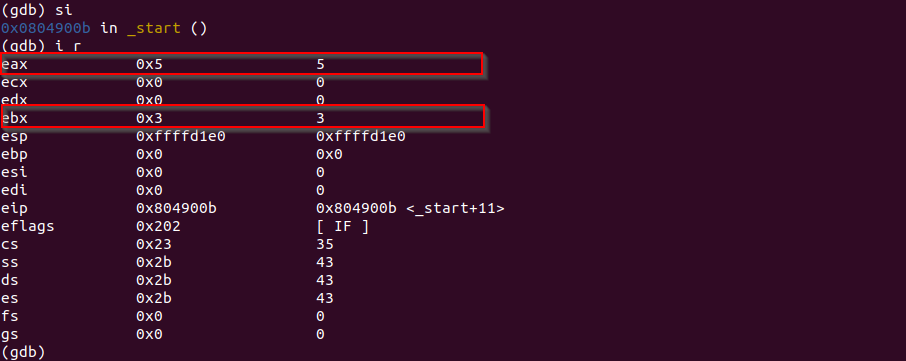
Most important part comes, let's single step one more time to swap the value in eax and ebx.
siThe values are swapped as in the picture. That's what XCHG instruction does.
Now, this document is for those of you who wonders how XCHG works. And this thread talks a little bit more. But to be honest, I personally am still in darkness after reading those.
It takes time.
MOV
In our last instruction example code, we wrote MOV instruction. Here is what is it.
MOV instruction, as the name suggests, moves values (be it an memory address, or some arbitrary value) to some location (be it another memory address or a register).
It can:
- Load a value into a register or a memroy address
- Load a value from one register to another register
- Load a value from a memory address to a register and vice-versa
Just remember it moves value (and this value can be memory address).
Let's dive into an example.
mov.asm
section .text

global _start

_start:
    MOV EAX, ESP
    MOV EBX, 0x31
    LEA EBX, [EBX + 0x10]
    MOV [EAX], EBX
    NOP
    NOP
So, we want to be able to access some address in memory, so we have to use ESP register, otherwise, we will highly likely get a violation error because we cannot access certain memory address. Hence the first instruction:
; move the address contained in ESP register into EAX
MOV EAX, ESP
Don't worry, just know that ESP is always accessible at this point. More on ESP later.
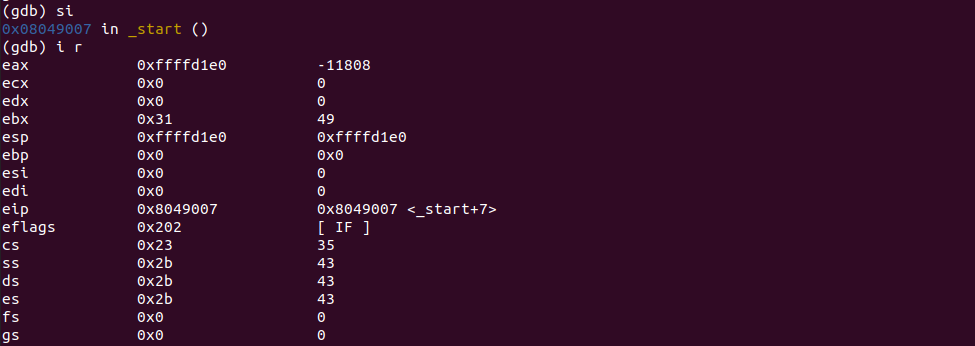
Next, we move the hex value 0x31 into EBX. It's very straight forward.
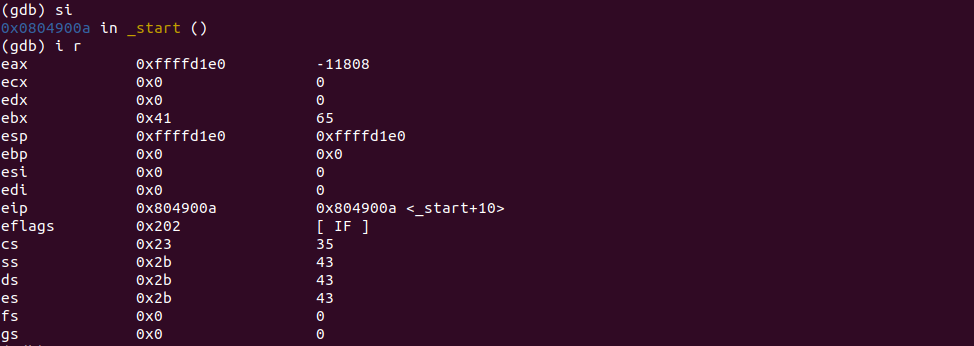
MOV EBX, 0x31Now, what we want to do is to add 0x10 to what's in EBX and put the result back into EBX, kinda like a += 2 in higher level programming languages.
LEA EBX, [EBX + 0x10]More on LEA instruction later.
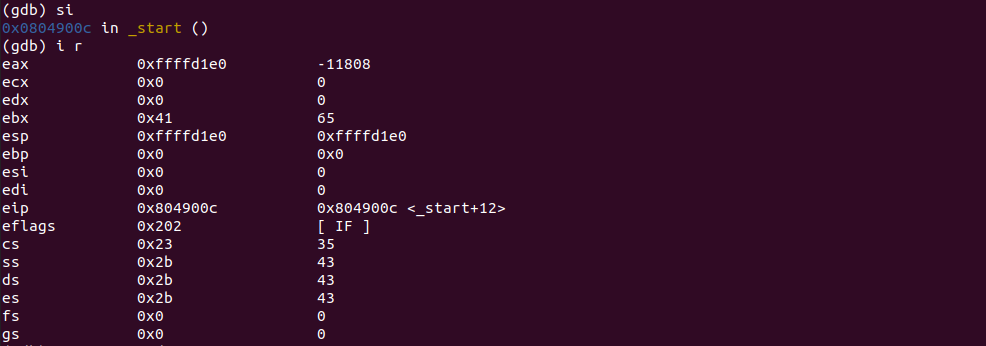
Next, we are moving what's in EBX to wherever the address in EAX register is pointing to at the moment (at the moment, it sure is ESP).
The [], is going to refer to the actual memory address location a register is contained.
MOV [EAX], EBXNow, [EAX] should contain value 0x41. And that's ASCII A if you use x/c to check the address location in EAX.
Please do use gdb to debug each step and confirm.
EAX contains ESP's address.
EBX contains value 0x31.
We added 0x10 to what's in EBX and put the result back in EBX.
We put what's in EBX into the memory location in EAX.
Check what's at the memory location in EAX.

This thread is for those of you who wants to understand a little bit more of the DWORD part. It doesn't make any difference here.
One thing I encountered that will throw error if you don't specify operation size (DWORD, or WORD or other size) is when moving value into ESP register.
Take the following code as example:
section .text

global _start

_start:
    MOV [ESP], 0x5
    NOP
    NOP
If you try to compile this code.
You'll get:

We need to specify how many bytes we are going to move. In this case, since 0x5 is only one byte long, specifying WORD or DWORD doesn't make any difference. But if you want to move 0xdeadbeef into ESP, you should only specify DOWRD, because 0xdeadbeef is 4-byte long.
Like this:
section .text

global _start

_start:
    MOV DWORD [ESP], 0xdeadbeef
    NOP
    NOP
A bit on LEA
LEA instruction is slightly different than MOV. The full name of LEA is Load Effective Address.
The difference is that LEA won't treat a value as memory address and try to dereference it, even in [].
Take the above code as example.
LEA EBX, [EBX + 0x10]LEA basically treat whatever value is in EBX as is, and add that value by 0x10, and put the result into EBX. No memory dereferencing is performed.
Consider MOV.
MOV EBX, [ESP + 0x10]It's going to take the value in ESP (which is an memory address), and add 0x10 to that address, then dereference that new address (simply means to to that address location), retrieve whatever value is inside, and put that value into EBX.
Hope I've made this clear enough.
More on LEA here.
Make Thins a Little Easier - Basic Makefile
Tired of typing the compiling and linking commands?
Instead of typing the following commands over and over again.
nasm -f elf32 nop.asm
ld -m elf_i386 nop.o -o nop
We have a more decent way of combining them together in a Makefile and use make command to do them all at once for us.
Makefile (in the same directory as the source):
# comment goes here
# define a target, you can call it whatever you like
# t will be used with make command later on
# here we assume the source code filename is nop.asm, change accordingly
all:
    nasm -f elf32 nop.asm
    ld -m elf_i386 nop.o -o nop
Save the file.
Now, when we have done editing the source code, and we have to recompile and relink to test out the new code.

With the new Makefile at hand, all we have to do is to issue the following command:
make allmake is going to execute each command for us.

And everything's ready!
Told you things are going to get easier! 😀
If you want to know more about make and Makefile, this GNU make manual is good place to start.
Arithmetic Operations
Here we are going to see all the basic arithmetic operations. INC, DEC, ADD, SUB, MUL, and DIV.
INC and DEC
Let's look at an example of INC instruction.
inc.asm
section .text

global _start

_start:
    MOV EAX, ESP
    MOV EBX, 0x40
    MOV [EAX], EBX
    INC BYTE [EAX]
    INC DWORD [EAX]
    NOP
    NOP
Let's compile and single step through each step.


We load EBX into the memory address in EAX.

After each INC instruction, the value at memory address pointed by EAX increases by 1.


DEC operates in reverse. Decrease the value by 1.
ADD and SUB
ADD and SUB operates on two operands, adding or subtract two values and store the result in a register.
add.asm:
section .text

global _start

_start:
    MOV EAX, 0x1
    ADD EAX, EAX
    ADD EAX, 0x3f
    MOV DWORD [ESP], 0x5
    ADD DWORD [ESP], 0x5
    SUB EAX, 01
    NOP
    NOP
I'll leave the compiling and debug part to you.
SUB operates in reverse, decrease the value by value specified.
MUL and DIV
MUL
From hereon, things are getting a bit more interesting.
We are going to talk a bout MUL instruction first. There are several things I'll point out which are very important next. Also, we will see MUL operation on DWORD, WORD and BYTE and check their difference.
For MUL, what you need to know is as follows:
- It accepts one operand;
- It goes to EAX to get the "multiplicand" value (e.g: 5 x 3, 5 is the multiplicand);
- It multiplies the value in EAX (multiplicand) by a "multiplier";
- The "multiplier" is from either a register or a memory location, it cannot be a constant;
- The result is stored in EDX:EAX; It's because the result of multiplication can be too large to EAX along to hold, so EDX will hold the higher order bits, while EAX will hold the low order bits (e.g: 0x100000000, EDX will hold 0x1, EAX will hold 0x00000000).
DWORD MUL
Let's look at an example.
mul.asm
section .text
global _start
_start:
MOV EAX, 0x3
MOV ECX, 0x2
MUL ECX ; EAX * ECX
MOV DWORD [ESP], 0x5
MUL DWORD [ESP] ; EAX * [ESP]
NOP
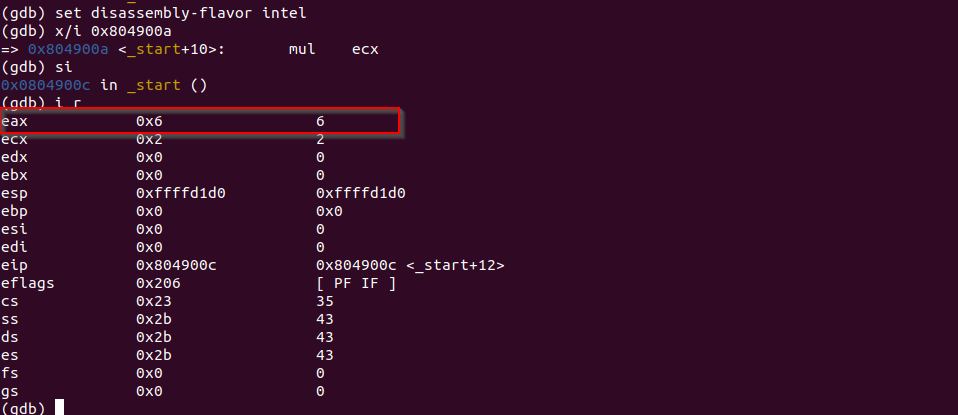
NOPLet's single step until we hit the multiply step. After single step over this instruction, EAX contains 0x6 (0x2 0x3). Since EAX along is enough to hold 0x6, so EDX is still 0x0*.
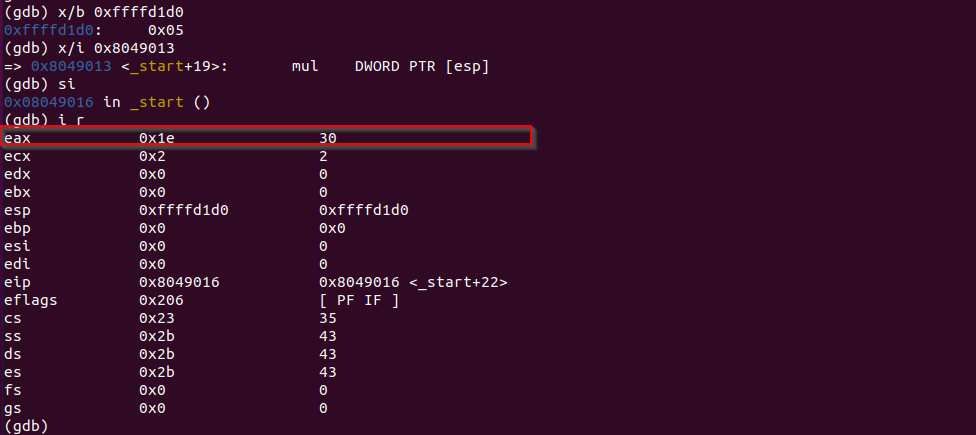
After moving 0x5 into the memory location of ESP and multiply it to EAX (0x6), we have 0x1e stored in EAX now.
Let's verify the result in calculator.

CPU means serious business huh 😛
What if we multiply two big numbers?
mul-big.asm
section .text

global _start

_start:
    MOV EAX, 0xdeadbeef
    MOV ECX, 0xc0ffee
    MUL ECX     ; EAX * ECX
    NOP
    NOP
Compile and debug the program, the result is as follows.
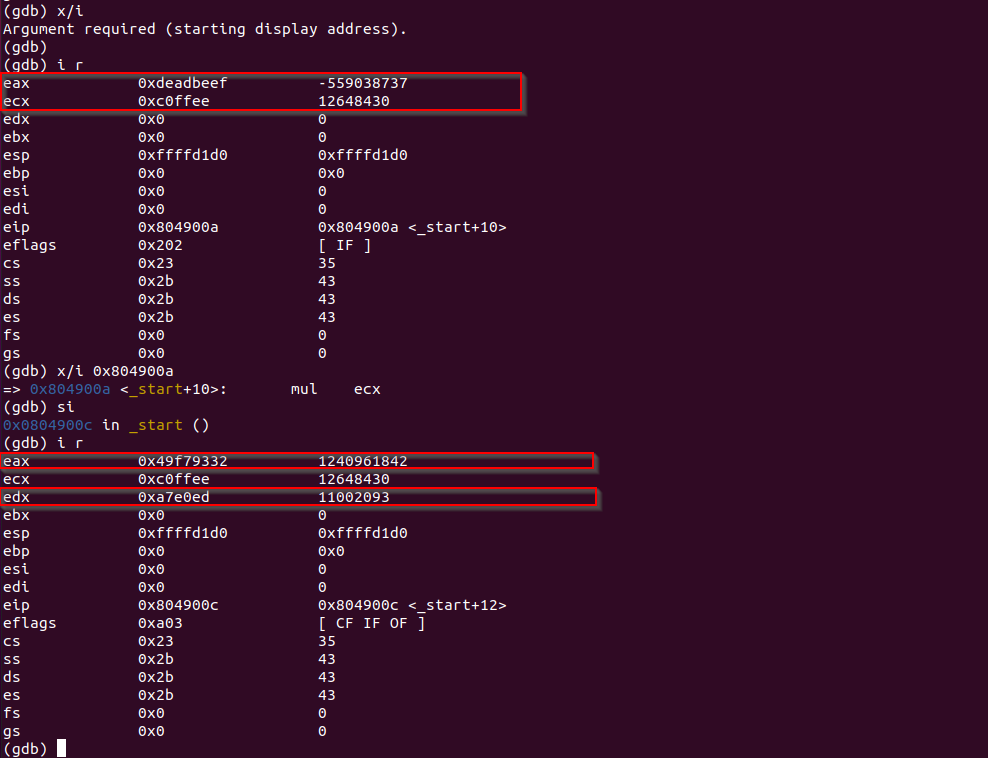
As shown in the picture, EDX now contains a value too.
Let's verify the result in calculator.

The result is:
A7E0ED49F79332So, EAX contains 0x49F79332, EDX contains 0xA7E0ED. That's correct.
WORD MUL
If we specify multiplier as WORD (2 bytes, 16 bites), the calculation will be different. As the result will be now stored in DX:AX since only 16 bits of the registers are used.
mul-word.asm
section .text

global _start

_start:
    MOV EAX, 0xdeadbeef
    MOV ECX, 0xc0ffee
    MUL WORD CX ; AX * CX
    NOP
    NOP
Compile and debug the program.
Let's analyze the result here.
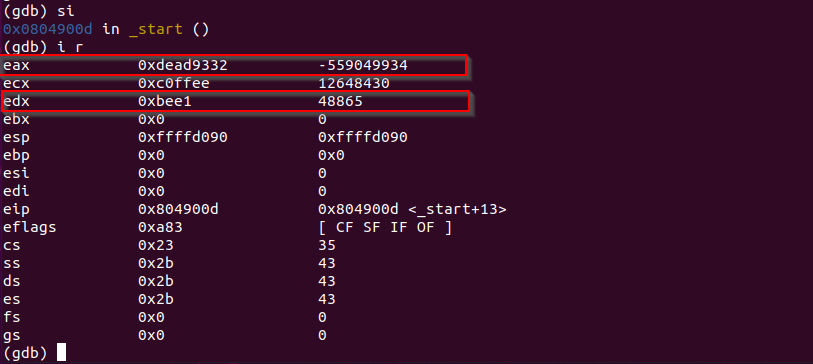
Because it's a WORD (2-byte) multiplication, so the only the lower 2 bytes or 16 bits of the value will be used for the operation, which are beef from EAX, and ffee from ECX.
The result of beef ffee = BEE1 9332*.
And it is stated that on WORD (2-byte) multiplication, the result will be stored in DX:AX.
So, AX holds 9332, and DX holds bee1, as expected from the picture.
MUL Byte
For 1-byte multiplication, the value in AL register will be used to multiply the value from the lower 8-bit of another register.
For example:
AL * CLThen, the result will be stored in AX as a whole.
AL * CL -> AXI suggest you test this out by writing a program and debug it.
We'll move on to DIV.
DIV
Next, let's take a look at DIV. DIV instruction follows the same pattern when it comes to DWORD DIV, WORD DIV and "BYTE DIV".
Check this table out.
| Data Size | Result |
|---|---|
| DWORD (32bits) | Result stores in EDX:EAX, EAX holds quotient, EDX holds remainder |
| WORD (16bits) | Result stores in DX:AX, AX holds quotient, DX holds remainder |
| BYTE (8bits) | Result stores in AX, AL holds quotient, AH holds remainder |
And as MUL, the divisor of DIV operation comes either from a register or memory address. It cannot be a constant.
Let's take a look at a simple example of DWORD DIV.
div.asm
section .text

global _start

_start:
    MOV EAX, 0x6
    MOV EBX, 0x2
    DIV EBX
    NOP
    NOP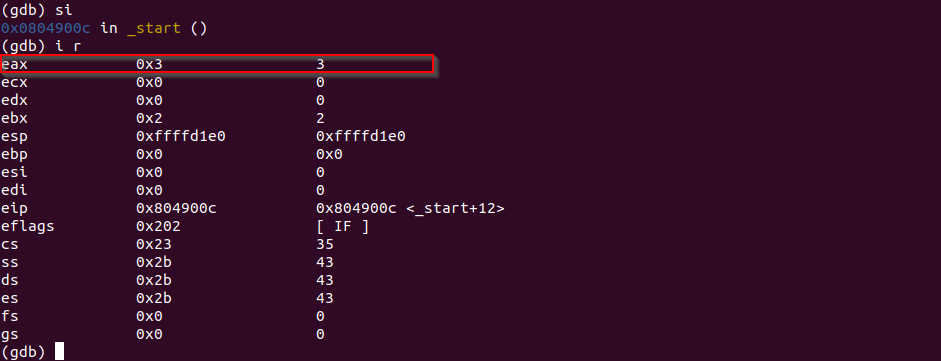
I suggest you try other divisions out yourself.
AND, OR, XOR, NOT
These four logical operation instructions are fairly easy. I will set tables for you to make things pretty clear.
| AND | Result |
|---|---|
| 0 AND 0 | 0 |
| 0 AND 1 | 0 |
| 1 AND 0 | 0 |
| 1 AND 1 | 1 |
| OR | Result |
|---|---|
| 0 OR 0 | 0 |
| 0 OR 1 | 1 |
| 1 OR 0 | 1 |
| 1 OR 1 | 1 |
| XOR | Result |
|---|---|
| 0 XOR 0 | 0 |
| 0 XOR 1 | 1 |
| 1 XOR 0 | 1 |
| 1 XOR 1 | 0 |
| NOT | Result |
|---|---|
| NOT 0 | 1 |
| NOT 1 | 0 |
Note that NOT instruction takes only one operand, as the other three takes two.
CALL, RET, JMP
These three are control flow instructions. As the name suggests, they may allow us to redirect execution flow to other location inside the program, and redirect back to where it was executing before.
The CALL instruction is very similar to JMP, but with a slight difference, we'll come to that shortly.
First let's take a look at JMP.
JMP
There are two most basic jumps, relative jump and absolute jump.
A relative jump is conducted according to the value of EIP. It jumps to the location relative to the current value of EIP register. We call that relative value offset. Relative jumps can be taken in the form of jumping to a label we define in our code, as we'll see in our example.
jmp.asm
section .text

global _start

_jump_here:
    MOV EAX, 0x41

_start:
    MOV EBX, 0x10
    LEA ECX, [ESP]
    JMP _jump_here
    NOP
    NOP
Let's compile and debug the program.
When our breakpoint on _start is hit, let's disassemble the program.
disassemble /r
Let's single step to the jmp instruction.
si
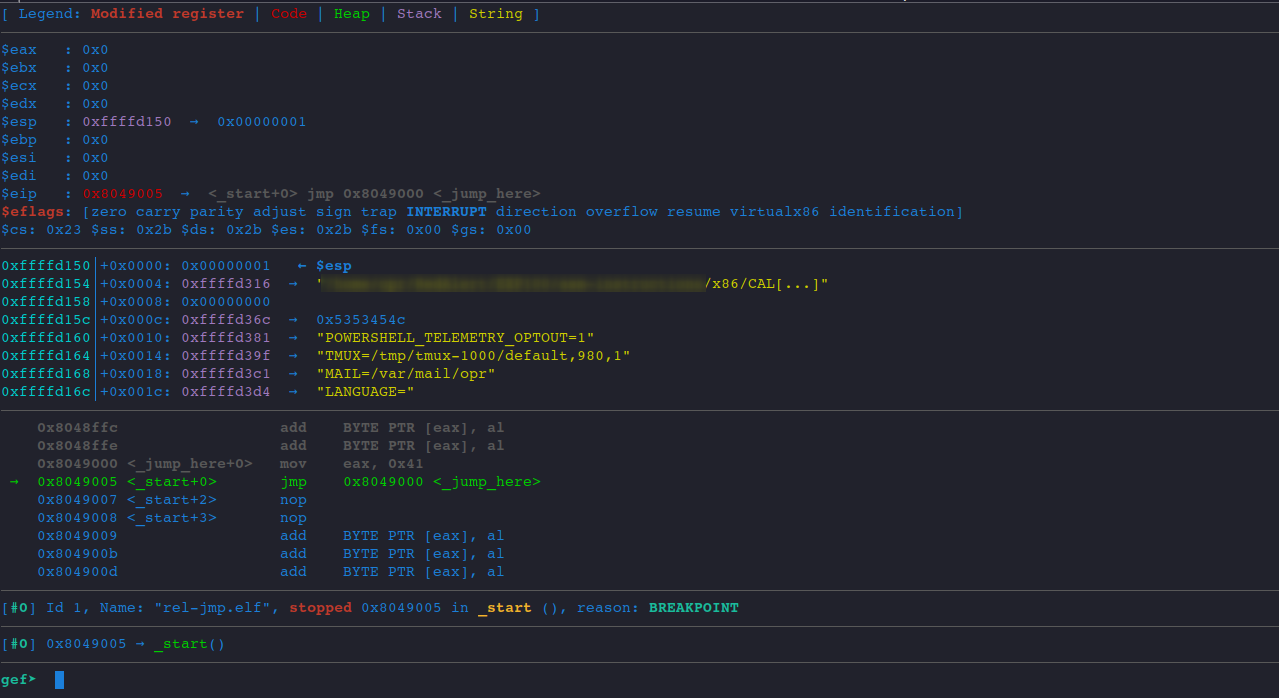
siWe are about to take the jump.

The opcode for the instruction is:
eb f1Note that there are different opcodes for jmp instruction, eb is one of them.
Let's stop here and think about this f1 here for a little bit. This is the offset we talked about.
EIP now is at memory location 0x0804900d.
When the jump instruction is executed, EIP is going to point at memory address 0x0804900f.
And the address we are about to jump to is at 0x8049000, as indicated in the picture.
The difference between 0x0804900f and 0x8049000 is:
0x8049000 - 0x804900f = 0xf1 (hex) = -15 (decimal)Which means we have to take the value in EIP, which is 0x0804900f, and compensate that with offset -15, to reach our label.
That being said, the offset is treated as signed number. The f1 here is actually -15.
For how negative numbers are stored in memory in 2's complementary form, please refer to this post.
So far so good, this is what relative jump is.
Now, let's look at an example of absolute jump.
For absolute jump, the operand for JMP instruction is a register. We move the address of our label into a register and then perform the jump to it.
abs-jmp.asm
section .text

global _start

_jump_here:
    MOV EBX, 0x41

_start:
    LEA EAX, [_jump_here]
    JMP EAX
    NOP
    NOP
Let's compile and debug the program.
After we hit our breakpoint, let's disassemble the code.

As we can see from the picture above, we are loading the memory address of _jump_here to EAX.
One more step over the code, we have jumped to our label.

I suggest you debug the program yourself. And you'll quickly find that something's wrong with it.
It's a dead loop. See for yourself.
The cause is very simple, there is no one to tell EIP where to go to after executing the code in our label.
To solve this problem, we have to discuss CALL and RET.
CALL and RET
The CALL instruction is very similar to JMP. It changes the value of EIP and redirect execution somewhere else.
The difference here is that CALL instruction will save the memory address of the next instruction on the stack, that's what we call return address. And RET will retrieve the return address on the stack after our code in the label is executed, and put that address back into EIP so the program can continue.
call-ret.asm
section .text

global _start

_jump_here:
    MOV EBX, 0x41
    RET

_start:
    CALL _jump_here
    MOV EAX, 0x42       ; it's not a dead loop now, the code can reach me here
    NOP
    NOP
Let's compile and debug the program.
We stopped at the very first instruction, the CALL instruction.
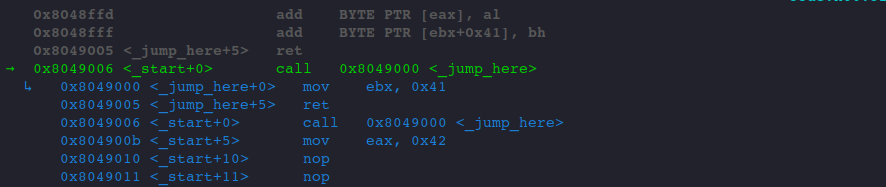
And we are about to take the memory address of the next instruction and save it onto the stack.
Note that the above picture from gef is a bit misleading, the ↳ sign shows the instructions inside our _jump_here label. And please don't mistake 0x8049000 as the memory address that the CALL instruction would save onto the stack. For clarity, we might as well use disassemble /r to disassemble the code and view the output.

The memory address of the next instruction following the CALL is:
0x0804900bSo pay attention to the value in the stack and how ESP changes.
At present, ESP is:

Let's single step.
si
ESP decreased by 4 bytes as expected.
Let's examine what's inside ESP.
x/4x $esp
That is the return address we are talking about, saved by the CALL instruction.
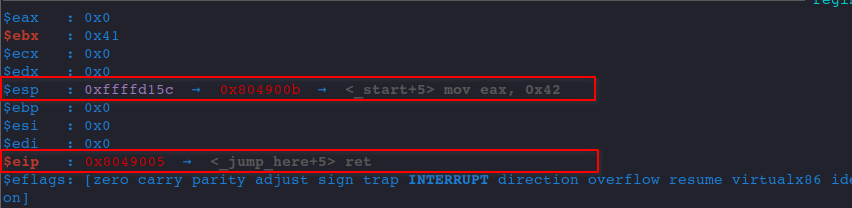
Now, let's single step once to reach the RET instruction.
si
gef indicates that we are about to return to the mov eax, 0x42 instruction after executing RET.
Let's again pay attention to the ESP and EIP as RET will retrieve the return address from ESP and set is to EIP.
As of now, the value in ESP and EIP is as follows.
Let's continue.
si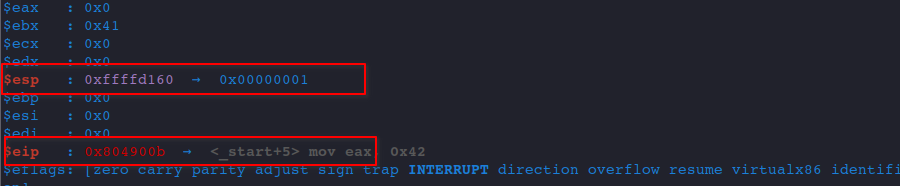
As we can see, after executing RET, ESP is increased by 4 bytes, and the value of return address is set in the EIP register.
Now, our program can keep executing from where it's redirected.

Conditional Jumps - TEST and JZ/JNZ, CMP and JXX
The conditional jumps can help us build logic like if/else statement. We'll discuss TEST first, then come to the more powerful CMP and lots of jump instructions.
TEST and JZ/JNZ
The TEST instruction takes two operands, they can be a register, a memory address, or an immediate value, and performs bitwise AND operation between them. Note that the two operands cannot be two memory addresses at the same time.
After the bitwise operation, a special flag called ZF (zero flag) in the EFLAGS register can be set according to the result. It the result is 0, then ZF will be set to 1, otherwise 0.
Then, we can use JZ (jump if ZF is 0) or JNZ (jump if ZF is 1) to take conditional jumps.
Let's look at an example.
test.asm
section .text

global _start

_loop:
    MOV EAX, 0x41

_start:
    TEST EAX, EAX
    JZ _loop
    NOP
    NOP

_end:
    NOP
    NOP
According to what we have discussed, the code should take the jump to _loop label and load 0x41 to EAX.
Let's compile and debug to confirm.
When we hit our breakpoint, EAX is initialized 0.

And we are about to TEST if EAX is 0.

We are sure they are, so we take the jump to _loop. As gef is intelligent enough to tell us that the jump will be TAKEN.

One more step through the code, we landed in our _loop label.

And let's check our eflags register status.
p $eflagsWe can see that ZF flag is set to 1 (whatever flag is in the list is set to 1).

And JNZ just does the opposite, it will take the jump if ZF is not set.
TEST is useful to check if a register or memory location contains value 0, since AND operation can only be 0 if all the bits are 0. And we can use TEST to implement a loop by testing if ECX is 0.
test-loop.asm
section .text

global _start

init_loop:
    MOV ECX, 10

loop:
    TEST ECX, ECX
    JZ _end
    DEC ECX
    JMP loop

_start:
    JMP init_loop
    JMP loop

_end:
    NOP
    NOP
This is for you to play with.
For more complex comparisons, we have to talk about CMP instructions and various other jumps.
CMP and JXX
Let's first talk about CMP instruction.
CMP instruction takes two operands. They can be a register, a memory address, or an immediate value. Note that it's the same as TEST, CMP cannot operate on two memory addresses.
The result of CMP instruction involves using the EFLAGS too.
We'll use examples to figure out how exactly those flags are set.
cmp-equal.asm
ction .text

global _start

_start:
    MOV EAX, 0x41
    MOV EBX, 0x41
    CMP EAX, EBX
    NOP
    NOP
We don't have to take any jumps here, since all we care about is how the EFLAGS are set.
Let's compile and debug the program.
After we hit our breakpoint.

Let's check the initial EFLAGS.

Only IF flag is set.
Let's step through the code until we hit our first NOP instruction.
# three times
si
Now, let's check EFLAGS again.

We can confirm that if two numbers are equal, the ZF flag will be set.
Next example, let's test what EFLAGS are set if EBX is larger then EAX.
cmp-ebx-greater.asm
section .text

global _start

_start:
    MOV EAX, 0x41
    MOV EBX, 0x42
    CMP EAX, EBX
    NOP
    NOP
Let's compile and debug.
After hitting our breakpiont.

Let's check initial EFLAGS.

Single step three time.
# three times
si
Let's check EFLAGS again.

We can see that CF PF AF SF IF flags if EBX is greater then EAX.
And if EAX if greater than EBX, only IF flag will be set.

Remembering the condition of these flags is difficult. What we have to do is use the various jump instructions to make a jump according to what we expect the result should be.
Here, JXX means there are many variations based on the result of CMP instruction.
The semantic meaning of the jump instructions themselves are quite clear.
Note that these jump instructions can be categorized into two groups, one for signed numbers and one for unsigned numbers.
Let me make tables for you all.
First, for signed numbers.
| Instruction | Description |
|---|---|
| JE/JZ | Jump if Equal / Jump if Zero |
| JNE/JNZ | Jump if not Equal / Jump if Not Zero |
| JG/JNLE | Jump if Greater / Jump if Not Less or Equal |
| JGE/JNL | Jump if Greater / Equal or Jump Not Less |
| JL/JNGE | Jump if Less / Jump if Not Greater or Equal |
| JLE/JNG | Jump if Less or Equal / Jump Not Greater |
Now, for unsigned numbers.
| Instruction | Description |
|---|---|
| JE/JZ | Jump if Equal / Jump if Zero |
| JNE/JNZ | Jump if not Equal / Jump if Not Zero |
| JA/JNBE | Jump if Above / Jump if Not Below or Equal |
| JAE/JNB | Jump if Above or Equal / Jump if Not Below |
| JB/JNAE | Jump if Below / Jump if Not Above or Equal |
| JBE/JNA | Jump if Below or Equal / Jump if Not Above |
Each logic contains two instructions that does the same thing. And as you can see from the capitalized letters, which makes memorizing quite easy.
Let's look at some examples. I'll put up sample base code, and change the jump instruction each time to see the behavior of disassembled instructions and the status of EFLAGS. We may discover something interesting.
cmp-test.asm
section .text

global _start

_start:
    MOV EAX, 0x41
    MOV EBX, 0x42
    CMP EAX, EBX
    JB _end
    NOP
    NOP

_end:
    NOP
    NOP

Change JB to JNAE:
...
JNAE _end
...
And, the assembler seems to make optimization and swapped our JNAE with JB.

Use JL:
...
JL _end
...

Use JNGE:
...
JNGE _end
...
Optimization happened here too, JNGE is swapped by JL.

So, stick to shorter instructions, the opcodes will take up less space.
I suggest you play around more.
To be continued... ### PUSH and POP ? Is stack going to be cleared after pop???
References
- https://www.felixcloutier.com
- https://www.calleluks.com/the-four-stages-of-compiling-a-c-program/
- https://stackoverflow.com/questions/23512281/what-does-the-the-dword-operand-do-in-assembly
- https://stackoverflow.com/questions/50102342/how-does-xchg-work-in-intel-assembly-language
- https://www.gnu.org/software/make/manual/make.html#Simple-Makefile
- https://infosecwriteups.com/pwndbg-gef-peda-one-for-all-and-all-for-one-714d71bf36b8
- https://www.cs.cornell.edu/~tomf/notes/cps104/twoscomp.html#:~:text=Two%27s%20complement%20is%20the%20way,add%20one%20to%20the%20result.
- https://filippo.io/linux-syscall-table/